Subtotal $0.00

Creality Slicer is one of the most widely used slicing tools in the 3D printing community, and Linux users often look for reliable ways to integrate it into their workflow. While many slicing programs are built primarily for Windows and macOS, Creality Slicer can still be used effectively on Linux with the right setup and understanding. In this guide, we will explore how to use Creality Slicer for Linux for consistent, high-quality 3D printing results.
This article will walk you through installation approaches, configuration steps, print settings optimization, troubleshooting tips, and best practices to help you achieve professional-level prints using Creality Slicer on a Linux system.
Installing Creality Slicer on Linux
Installing creality slicer for linux requires a slightly different approach since there is no official native Linux version from Creality. However, users can still run it smoothly using compatibility layers such as Wine or by using alternative packaged versions that support Linux environments.
The most common method is installing Wine, a compatibility tool that allows Windows applications to run on Linux. After installing Wine, you can download the Windows version of Creality Slicer and run the installer through Wine. This method is widely used because it provides full access to the slicer’s features without modification.
Another option is using tools like PlayOnLinux or Bottles, which simplify Wine configuration. These tools help manage dependencies and settings automatically, making the installation process easier for beginners. Once installed, Creality Slicer runs almost like a native application.
It is important to ensure your Linux system is updated and has proper graphics drivers installed. A stable GPU driver setup helps prevent rendering issues in the slicer preview window and ensures smooth slicing performance.
Setting Up Creality Slicer for First Use
After installing creality slicer for linux, the first step is configuring the software for your specific 3D printer model. Creality Slicer includes preloaded profiles for many Creality printers, which makes setup easier and faster for users.
When you launch the software for the first time, select your printer model from the list. If your printer is not listed, you can manually configure bed size, nozzle diameter, and firmware type. These settings are essential for ensuring accurate slicing and preventing print failures.
You should also configure the filament type and default print settings. PLA, ABS, and PETG each require different temperature and speed settings. Selecting the correct profile ensures that the slicer generates optimized G-code tailored to your material.
Finally, save your printer profile so you do not need to reconfigure it every time. Proper setup ensures that your Linux-based workflow remains smooth and efficient from the beginning.
Optimizing Print Settings for Better Results
Once creality slicer for linux is set up, the next step is optimizing print settings for quality and reliability. One of the most important settings is layer height, which determines the resolution of your print. Lower layer heights produce smoother surfaces, while higher ones reduce print time.
Infill density is another critical setting. For strong functional parts, a higher infill percentage (20–50%) is recommended, while decorative models can use lower infill to save material and time. Adjusting infill patterns such as grid or gyroid can also improve structural strength.
Print speed and temperature settings should be carefully balanced. Faster speeds reduce print time but may affect quality, especially for detailed models. Similarly, nozzle temperature must match filament specifications to avoid issues like stringing or under-extrusion.
Retraction settings are also important for reducing stringing between printed parts. Fine-tuning retraction distance and speed can significantly improve surface quality, especially in complex models with multiple edges.
Slicing and Preparing G-code Efficiently
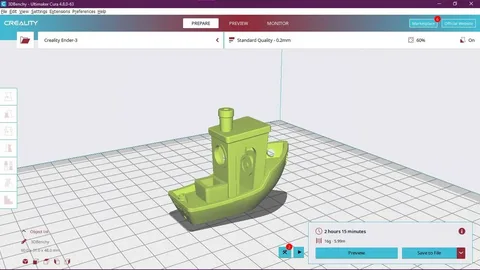
Slicing is the core function of creality slicer for linux, where your 3D model is converted into machine-readable G-code. After importing your STL or OBJ file, you can position, scale, and rotate the model on the virtual build plate.
Before slicing, always check model orientation. Proper orientation can improve strength and reduce the need for supports. For example, flat surfaces should be placed on the print bed to ensure better adhesion and stability during printing.
Once the model is positioned, click the “Slice” button. The software will analyze your settings and generate a preview of each layer. This preview is extremely useful for identifying potential issues like overhangs, missing supports, or weak structures.
After slicing, save the G-code file to your system or directly transfer it to your printer via SD card or USB connection. Reviewing the preview before printing helps prevent wasted filament and failed prints.
Troubleshooting Common Issues on Linux
Using creality slicer for linux may occasionally present issues due to compatibility layers or system configurations. One common problem is software lag or graphical glitches when using Wine. This can often be resolved by updating graphics drivers or switching Wine versions.
Another issue users face is missing fonts or interface elements. This happens when Wine lacks necessary Windows libraries. Installing additional dependencies through Winetricks usually resolves this problem quickly.
Printing errors such as poor adhesion or layer shifting are not directly caused by the slicer but by incorrect settings or calibration. Ensuring your printer is properly leveled and that slicer settings match your filament type is essential.
If slicing takes too long or crashes, reducing model complexity or increasing system memory allocation for Wine can help improve stability. Regular updates to both Linux and Creality Slicer also improve performance over time.
Conclusion
Using creality slicer for linux is entirely possible and can be highly effective when properly configured. Although it requires a few extra steps compared to Windows or macOS, Linux users can still enjoy a smooth and powerful 3D printing workflow with the right setup.
By correctly installing the software, optimizing print settings, and understanding how slicing works, you can achieve professional-quality 3D prints consistently. With practice and fine-tuning, Creality Slicer becomes a reliable tool in any Linux-based 3D printing environment.