Subtotal $0.00

Embroidery can turn a plain item into something special. A logo, name, or shape can look clean and sharp when stitched the right way. But many beginners face one common problem. Their design changes shape after sewing. Circles look wide. Squares look bent. Text may look thick or thin.This happens because thread pulls fabric as it stitches. Some areas spread out, and some areas tighten in. Learning Understanding Push and Pull Compensation in Embroidery can help you see why this happens and how to fix it.
Once you know the cause, you can make better designs with less waste.The good news is that you do not need years of skill to improve. Small changes can make a big difference. Better hooping, smart settings, and test runs can help your work look more clean and true to shape. In this guide, you will learn simple beginner tips to control design stretch and squeeze in embroidery.
What Design Stretch and Squeeze Mean
When a machine stitches, thread goes into fabric many times. This motion creates force.
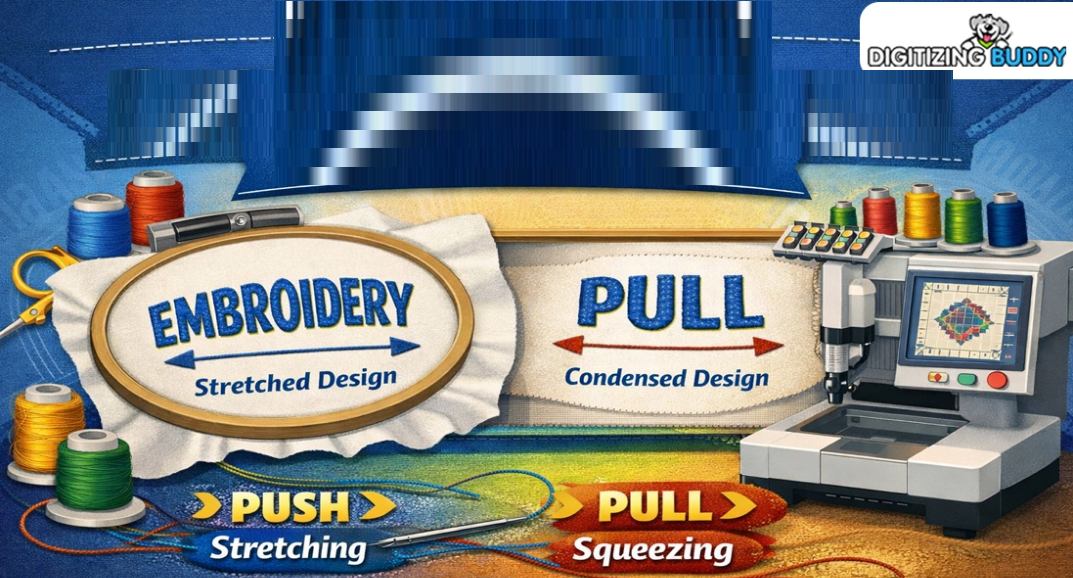
Stretch
Stretch means the design grows wider or longer than planned.
Example:
- A circle may look oval
- Text may look wide
- Borders may move out
Squeeze
Squeeze means the design becomes smaller or tight in one area.
Example:
- Letters look narrow
- Shapes pull inward
- Gaps may appear
These changes are normal in embroidery. The goal is to manage them.
Why This Happens in Embroidery
Fabric is soft and moves. Thread is tight and pulls. Needles also push through the cloth many times.
This mix can cause:
- Fabric shift
- Shape change
- Edge pull
- Uneven fill areas
Some fabrics move more than others. Thin knits, fleece, and stretch items often need extra care.
Start With Good Fabric Choice
Beginners should start on easy fabric. This helps you learn faster.
Best Fabrics for Practice
- Cotton
- Canvas
- Stable twill
- Medium woven cloth
These fabrics hold shape better.
Harder Fabrics for New Users
- T-shirts
- Stretch knits
- Towels
- Thin silk
Use simple fabric first. Then move to harder items later.
Use the Right Stabilizer
Stabilizer is one of the best tools for shape control. It supports the fabric during stitching.
Cut Away
Best for stretch fabric and shirts. It stays under the design.
Tear Away
Best for stable woven fabric.
Wash Away
Used for lace or special jobs.
Quick Tip
If fabric moves a lot, use stronger support. Weak support often causes stretch and squeeze.
Hoop Fabric the Right Way
Poor hooping can ruin a good design.
How to Hoop Well
- Keep fabric flat
- Remove wrinkles
- Do not pull too hard
- Make it firm, not stretched
- Center the design area
If you stretch fabric in the hoop, it may shrink later when removed.
That can change the design shape.
Pick the Right Needle
A wrong needle can drag fabric or damage thread.
Good Needle Choices
Sharp Needle
Good for woven fabric.
Ball Point Needle
Good for knit fabric.
Fresh Needle
Always better than a dull one.
Change needles often. A clean point helps smooth stitching.
Watch Thread Tension
Tension controls how tight thread pulls.
If top tension is too tight:
- Fabric may pucker
- Design may shrink
- Thread may break
If too loose:
- Loops may show
- Stitches may look messy
Smart Beginner Tip
Make small changes only. Test after each change.
Reduce Too Much Stitch Density
Density means how close stitches are packed.
Too many stitches in one spot can pull fabric hard.
Signs of High Density
- Thick stiff design
- Raised surface
- Fabric wrinkling
- Shape loss
Better Choice
Use balanced density. Enough thread to cover, but not too much.
Good digitizing helps here.
Use Underlay Stitches
Underlay is the base stitch under the top stitches. Many beginners ignore it, but it matters a lot.
Why Underlay Helps
- Holds fabric in place
- Adds support
- Smooths top stitches
- Improves edges
It can reduce movement during stitching.
Slow Down the Machine
Fast speed looks nice, but it can increase movement on some fabrics.
Use Slower Speed For:
- Small text
- Thin fabric
- Stretch items
- Detail logos
A slower speed often gives cleaner shape control.
Test on Scrap Fabric First
Never test first on the final item.
Use fabric like the real item and run the design first.
Check These Things
- Is the shape correct?
- Are letters clean?
- Any puckering?
- Are edges smooth?
Then adjust and test again.
This habit saves time and money.
Learn Direction of Stitches
Stitch angle changes how thread pulls fabric.
Example
Horizontal fill may pull one way. Vertical fill may pull another way.
Changing angle can improve shape and reduce stress on one side.
Good digitizers use this often.
Keep Designs Simple at First
New users should not start with tiny text and heavy logos.
Better First Designs
- Simple names
- Basic shapes
- One-color logos
- Clean borders
These help you learn machine behavior without too many issues.
Common Beginner Mistakes to Avoid
Pulling Fabric Too Tight in Hoop
This can cause shrink after unhooping.
Using No Stabilizer
Fabric may move too much.
Old Needle
Can snag fabric and hurt shape.
Very Dense File
Can create bunching.
No Test Run
Leads to wasted items.
Avoiding these mistakes gives faster progress.
Best Fabrics Need Different Care
Not all items behave the same.
T-Shirts
Use cut away and ball point needle.
Caps
Need cap frame and clean center path.
Towels
Use topping so stitches stay visible.
Jackets
Stable fabric, but test first.
Always match setup to the item.
Keep Notes for Each Job
This is a pro habit and helps beginners grow fast.
Write down:
- Fabric type
- Needle size
- Stabilizer used
- Speed setting
- Thread brand
- Result notes
Soon you build your own guide from real work.
How I Improve Results in Real Use
When I see a logo stitch too wide, I do not guess. I test step by step.
First, I check hooping. Then stabilizer. Then density. Then tension. Last, I review the file.
Most times, the issue is one small setup problem. Simple checks solve it faster than random changes.
This hands-on method builds trust and skill.
Signs Your Setup Is Working
You know things are right when you see:
- Clean edges
- Flat fabric
- True shapes
- Smooth fills
- Easy thread flow
- Neat text
These are signs of a balanced setup.
Build Skill With Weekly Practice
Week 1
Practice circles and squares.
Week 2
Try names with satin stitch.
Week 3
Use fills on logos.
Week 4
Test on shirts or bags.
Short practice sessions work well. Repeat often.
When to Edit the Design File
Sometimes machine setup is fine, but the file needs work.
You may need to adjust:
- Width of letters
- Shape size
- Stitch angle
- Density
- Underlay type
Good files stitch better than poor files.
Patience Matters in Embroidery
Many beginners want perfect work on day one. That is normal, but embroidery takes testing.
Every failed sample teaches something:
- Better support
- Better speed
- Better tension
- Better file choice
Stay patient. Each run builds skill.
Quick Checklist Before You Stitch
Before Start
- New needle
- Right thread path
- Correct hooping
- Good stabilizer
- Test file ready
During Stitching
- Watch thread breaks
- Watch shifting
- Stop if puckering starts
After Finish
- Check shape
- Review notes
- Save settings
This routine helps every project.
Final Thoughts
Design stretch and squeeze are common in embroidery, but they can be controlled. Use stable fabric, good hooping, proper stabilizer, and smart machine settings. Slow down when needed. Test before final runs. Keep notes and learn from each project.
You do not need to know everything at once. Start simple and improve one step at a time. Soon your shapes will look cleaner, your text will look sharper, and your embroidery will look more professional with every stitch.